Managing media in Umbraco is simple and user-friendly. Whether you need to upload new images, edit existing ones, or set important details like alt text, Umbraco has all the tools you need to keep your media library organised and functional.
Uploading Media
Log in to your Umbraco Dashboard and navigate to the Media section on the top navigation menu.
Click the “Create” dropdown button, to view the various media types that can be uploaded.
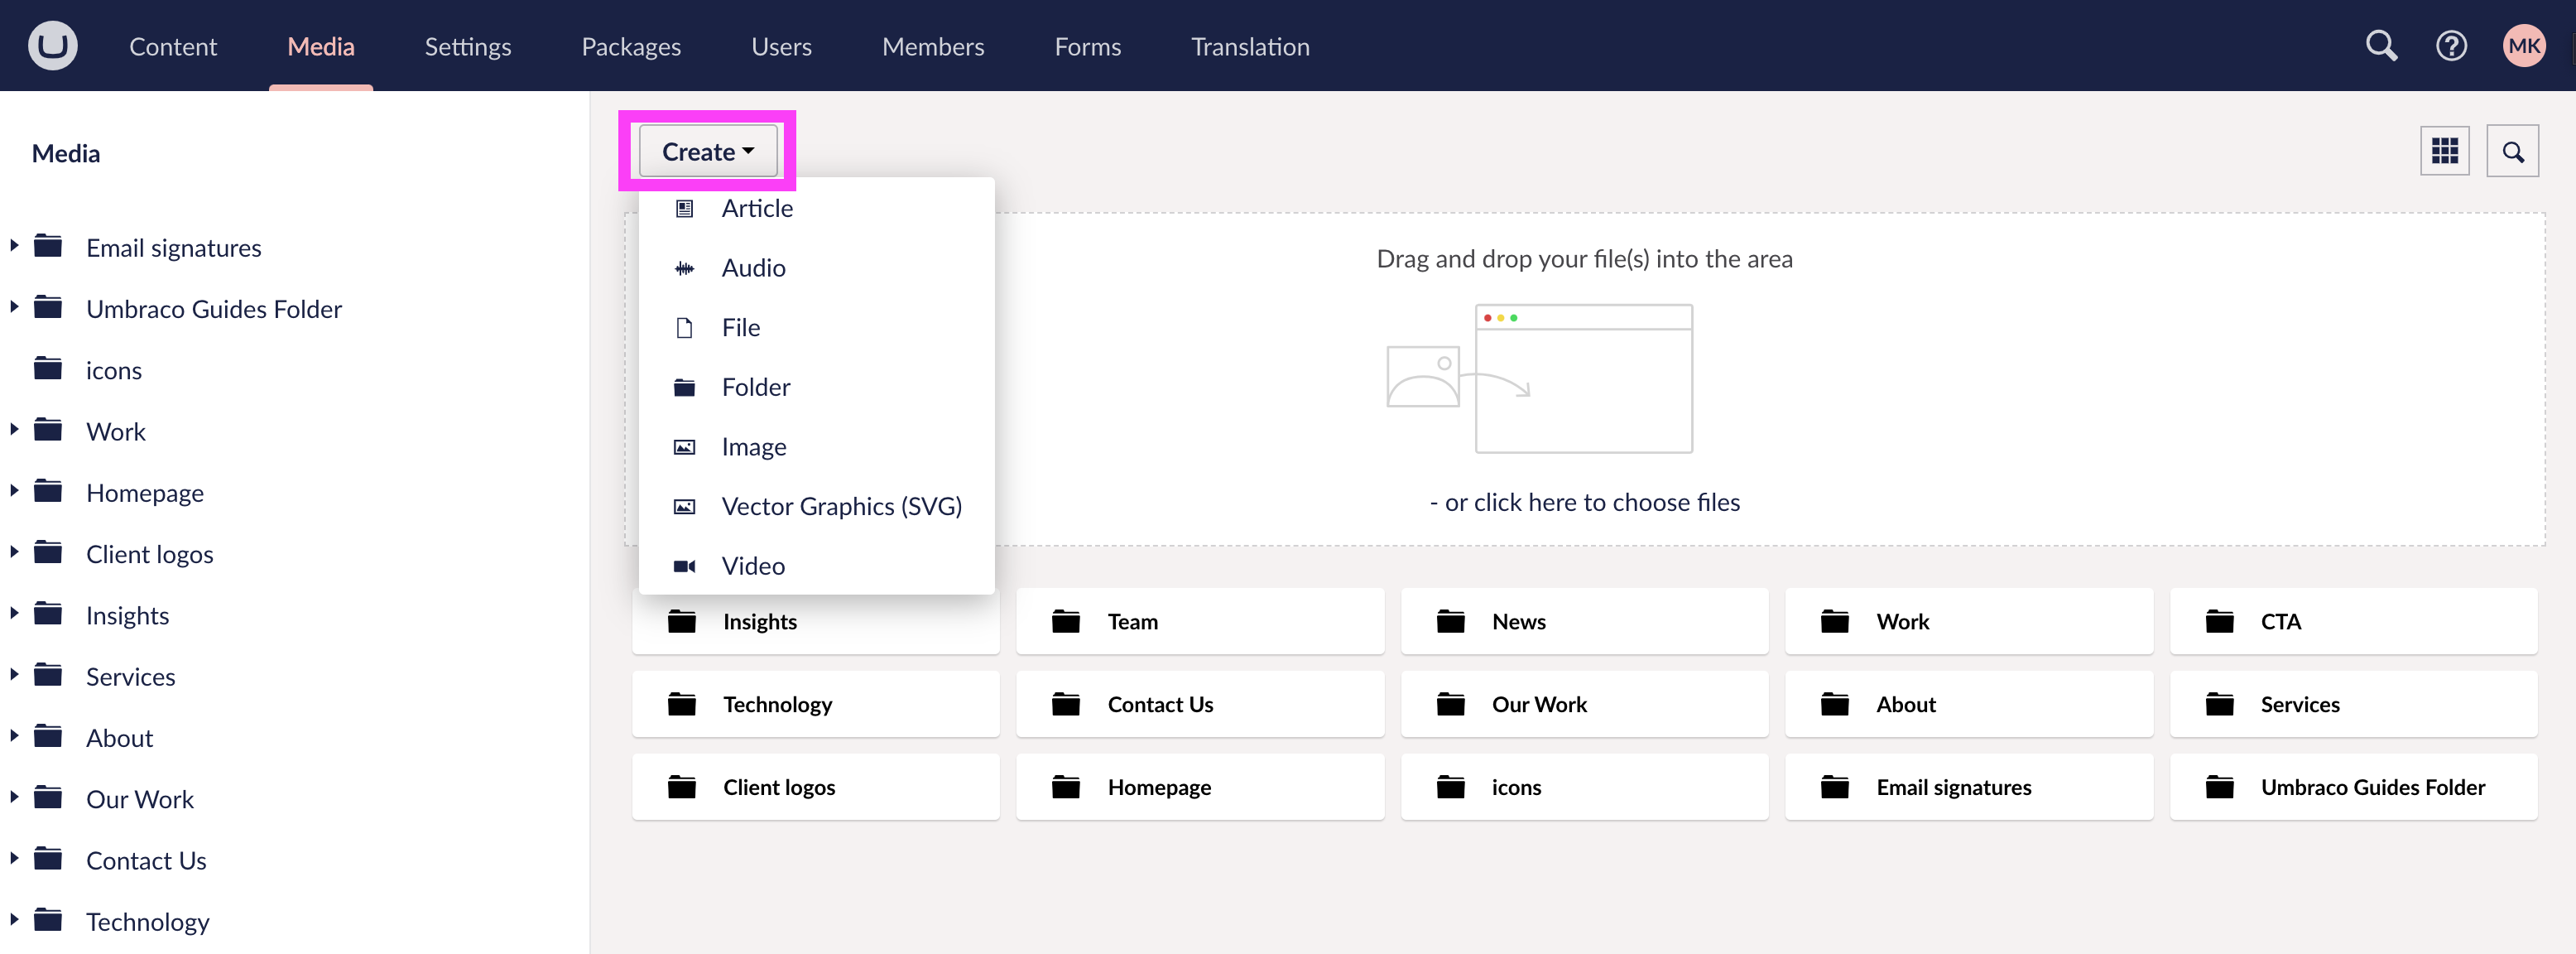
For better organisation, it's recommended to create folders. Either open an existing folder or create a new one before uploading your files.
There are three easy ways to upload media in Umbraco:
-
Drag and Drop: Simply drag and drop your files into the designated area at the top of the Media section.
-
Create Dropdown: Click the Create dropdown, select the media type you'd like to upload, and choose your file from your computer.
-
From the Content Section: When adding media to a content block (e.g., an image block or a button linking to media), a right-hand modal will appear. Here, you can either select existing media or upload new files using the drag and drop feature or by clicking the Upload button within the modal.

Choose the media file from your computer and click Open to upload it to the media library.
Your media file will now appear in the chosen folder.
Moving Media and Media Folders
In the Media section, find the file or folder you wish to move.
Select the media item or folder - avoid clicking directly on the text, as this will open the item's settings or display the folder contents. Instead, click outside the text area to ensure proper selection.
Multiple media items or folders can be selected at once.
A toolbar will appear at the top of the screen, showing the number of selected items and three action buttons:
-
-
Clear Selection: Deselects all selected items or folders.
-
Move: Opens a right-hand panel displaying the media folder tree and a search bar for easy navigation.
-
Delete: Triggers a confirmation popup to verify before permanently deleting the selected items.
-
Choose the destination folder, and click “Submit” to confirm.
Media Limits in Umbraco
-
Umbraco may enforce file size limits depending on your hosting configuration. If you run into errors during upload, it's a good idea to check with your developer or hosting provider about any media size restrictions.
-
To enhance performance and ensure files meet size requirements, it's recommended to optimise large images. This reduces loading times and improves overall user experience.
-
Umbraco recommends using SVG files for icons or illustrations, as they offer better scalability and quality compared to raster formats like PNG, JPEG, WebP, or AVIF. SVGs ensure sharper visuals and smaller file sizes, making them ideal for these types of graphics. View Umbraco's Image Optimisation Guide
- At Appcentric, we make image optimisation a top priority, ensuring that both our clients and their users experience faster, more efficient access to the CMS front end.
Editing Media
To view the details of a media item, navigate to the Media section and click on the item's text, not the image. Clicking the image will select the media item, while clicking the text will open its details.
Within the Content tab, you can edit the following:
-
Name: Update the name of the media file for clarity and easier searching.
-
Replace Media Item: To replace the current media file while retaining its settings, click the Remove file(s) button below the media item. This will delete the existing file and display an upload box where you can add your new media file.
-
Image Focal Point: When editing image files, you'll see a transparent circle in the centre of the image. This feature is particularly useful for adjusting the focus of large images, such as a landscape used in a banner. For instance, if the top right corner of the image is the most important part, you can set it as the focal point to ensure it remains prominently displayed.
-
Image Cropping: When editing image files, you’ll see a selection of preset sizes to the right of the original image. These sizes correspond to the content blocks within the CMS. By selecting one of these presets, the cropping tool will appear, featuring a slider that lets you zoom in or out to fit the image into the specified size. This ensures the image maintains its original ratio and does not stretch.
-
Media Details: You can view the standard details of a media item, including its width, height, size, and type.
-
Alt Text: Add descriptive alt text for accessibility and SEO. Alt text is important for search engines and users who rely on screen readers.
Within the Info tab, you can view the following:
-
Links: The URL where your media item is located.
-
Referenced By: Lists all the places your media item is used, including the node name, status, type name, type, and relation.
-
History: Shows the editing history, including who made changes and when.
-
General: Provides key details such as creation date, creator, last edit date, media type, and media ID.
In the Actions dropdown, you can perform the following tasks:
- Create: Accessible primarily within a folder, allowing you to create new folders, images, files, videos, audio files, articles, or vector graphics (SVGs).
- Move: Opens a modal with the content tree of Media folders. Select a folder to move the media or folder to.
- Delete: Opens a confirmation modal to ensure you want to permanently delete the selected items.
- Sort: Lets you rearrange items within a folder or across multiple folders.
- Reload: Refreshes the viewport to display any recent updates, including changes made by other users.
- Export: Opens a modal allowing you to select dependencies, then creates a ZIP file containing the selected items.
Recovering a Media Item from the Recycle Bin
The Umbraco CMS has two Recycle Bins: one for Media and one for Content. To access the Media Recycle Bin, go to the Media tab and scroll to the bottom of the left-hand panel. Here, you’ll find all deleted media items. You can restore items from this bin or choose to permanently delete them.
To restore a media item back to its original location, click the text of the media item to open the details. From the Action dropdown tab (top right), select Restore.
To restore a media item to a new location, you can use the “Move” function. This can be found in two locations:
Open the media item details by selecting the name of the media item to open the media items details page and select the Action dropdown tab (top right), select Move. A modal will open with the Media content tree, select the folder you would like to move the media item to and select “Move”.
Inside the Recycle Bin folder, click on the image of the media item, not the name. This method can be used to select multiple media items at once or just a singular media item. Once selected, a toolbar will appear at the top of the screen, showing the number of selected items and three action buttons:
-
Clear Selection: Deselects all selected items or folders.
-
Move: Opens a right-hand panel displaying the media folder tree and a search bar for easy navigation.
-
Delete: Triggers a confirmation popup to verify before permanently deleting the selected items.
Choose the destination folder, and click “Submit” to confirm.
By following these steps, you can manage, edit, and optimise your media files in Umbraco, ensuring your site’s media library is clean, organised, and ready to use.
Next insight

